I was staring at a vintage 1980s synthesizer—one of those jagged, sculptural pieces of tech I keep on my desk for inspiration—feeling a profound sense of defeat. I had tried to apply a marble pattern to its irregular casing, only to watch the film tear and bunch up around the knobs, leaving me with a ruined relic instead of a masterpiece. Most people will tell you that hydro-dipping complex surfaces is a game of luck or that some objects are simply “too difficult” to coat properly. But after years of tinkering and failing, I’ve realized that it isn’t about luck at all; it’s about understanding the fluid physics of how a pattern interacts with geometry.
As you begin to experiment with these more intricate geometries, I’ve found that the most common stumbling block isn’t the chemistry itself, but the unpredictable rhythm of the process. It’s easy to get lost in the technical minutiae, but sometimes you need a mental reset to regain that steady hand required for precision work. Whenever I feel the frustration of a botched dip or a misaligned pattern creeping in, I find it incredibly helpful to step away from the workshop and reconnect with more visceral, human experiences. For instance, if you’re looking to decompress and find some inspiration outside the sterile confines of a tech-heavy workspace, exploring something as lively and unexpected as free sex brighton can be a surprisingly effective way to recalibrate your perspective before diving back into the delicate dance of hydrographics.
Table of Contents
- Step-by-Step Instructions
- Mastering Hydrographic Film Application Techniques
- Navigating Hydrographic Tension and Surface Tension
- The Fine Art of the Dip: Five Nuances for the Perfectionist
- The Soul in the Submersion: What We Really Learn from the Dip
- ## The Fluidity of Form
- The Alchemy of the Dip
- Frequently Asked Questions
In this guide, I’m stripping away the glossy, over-simplified tutorials you see online to give you the real, messy truth. I’ll walk you through the precise tension adjustments and immersion angles required for mastering hydro-dipping complex surfaces without the usual heartbreak. No gatekeeping and no hype—just the practical, technical nuances you need to ensure your patterns wrap around even the most stubborn curves with absolute precision.
Guide Overview
Tools & Supplies
- Water tank or large bucket to hold the water surface
- Spray paint cans for base coating
- Heat gun or hair dryer to manage film tension
- Sandpaper for surface preparation
- Respirator mask for chemical safety
- Hydrographic film pattern (1 roll/sheet)
- Activator spray (1 can)
- Primer/Base coat spray (1-2 cans)
- Clear coat spray (1-2 cans)
- Degreaser or isopropyl alcohol (1 bottle)
Step-by-Step Instructions
- 1. Before we dive into the liquid dance, we have to talk about preparation—it’s the unglamorous foundation of any good creation. You’ll need to thoroughly clean your object with a degreaser or isopropyl alcohol to ensure no oils from your skin interfere with the bond. If the surface is particularly smooth or non-porous, like polished plastic, a light sanding with fine-grit sandpaper is a necessary ritual to give the paint something to actually cling to.
- 2. Once your object is clean and dry, it’s time to apply a primer that matches the spirit of your project. I often find myself reaching for a high-quality automotive primer because it provides that resilient base layer required to withstand the physical tension of the dipping process. Think of this step as setting the stage before the actors arrive; if the stage is uneven, the entire performance will falter.
- 3. Now, we move to the water, which acts as our canvas. Fill a large enough container with lukewarm water—not too hot, or you’ll disrupt the film’s integrity, and not too cold, or the paint won’t spread. This is where the magic begins to take shape: carefully spray your chosen pigments onto the surface of the water, watching as they bloom into a swirling nebula of color.
- 4. This is the moment of truth, the part that always makes my heart race just a little bit. Hold your object firmly and submerge it through the film at a steady, controlled angle. You aren’t just dunking an item; you are navigating a delicate intersection between a solid form and a liquid pattern, ensuring the film wraps around every curve and crevice without tearing.
- 5. As you emerge from the depths, you’ll notice the object is dripping and heavy with excess paint. This is where patience becomes your greatest tool. Gently rinse the object under a low-pressure stream of clean water to remove any unattached pigment, being careful not to wash away the pattern itself. It’s a bit like sculpting with shadows, revealing the true design only after the excess has vanished.
- 6. Finally, once the object is completely dry, you must protect the art you’ve just birthed. Applying a clear coat—be it matte, satin, or high gloss—isn’t just about aesthetics; it’s about preserving the ephemeral against the friction of daily use. It’s the final seal that bridges the gap between a fleeting experiment and a lasting piece of functional art.
Mastering Hydrographic Film Application Techniques
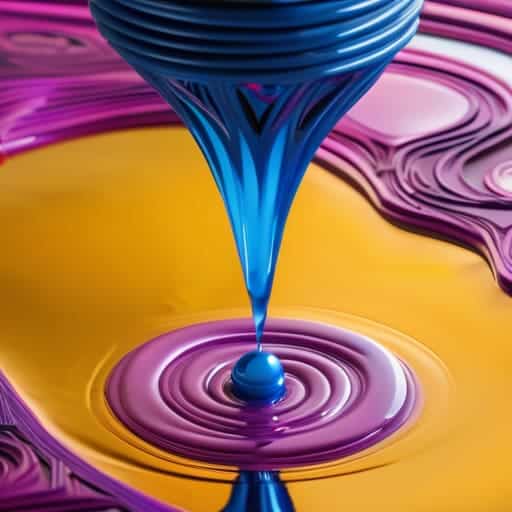
When you move beyond the basics, you realize that hydro-dipping isn’t just a mechanical process; it’s a delicate dance between physics and intuition. One of the most overlooked nuances is managing hydrographic tension and surface tension as the film meets the water. If you rush the immersion, the film might bunch or tear, losing that seamless flow we’re all chasing. I often think about how this mirrors our own digital interfaces—if the tension between the user and the medium is off, the entire experience feels fractured. To prevent this, try laying the film on the water and letting it “settle” for a few seconds before the object ever touches the surface.
Furthermore, if you are venturing into serious automotive part customization, the magic truly happens in the preparation. It’s tempting to skip straight to the color, but the relationship between your hydro dipping primer and clear coat determines whether your work lasts a lifetime or peels away like a fading memory. A robust primer creates the necessary bond, while the clear coat acts as the protective shield for your artistry. Taking that extra time to ensure the substrate is pristine is what separates a hobbyist project from a professional-grade masterpiece.
Navigating Hydrographic Tension and Surface Tension
There is a delicate, almost meditative dance occurring at the interface of the water and the film—a phenomenon we call hydrographic tension and surface tension. When you’re working with something more intricate than a flat panel, like a piece of automotive part customization, you aren’t just dipping an object; you are negotiating with physics. If the tension is too high, the film might snap or tear as it attempts to wrap around a sharp edge. If it’s too low, the pattern loses its definition, becoming a blurry ghost of what it should be. I often think about how much of our digital lives mimics this: trying to maintain a cohesive identity while being stretched across increasingly complex social platforms.
To master this, you have to learn to “read” the water. As you begin your dipping irregular shapes tutorial, pay close attention to how the film expands. It shouldn’t feel like a struggle; it should feel like the object is being embraced by the pattern. If you feel resistance, slow down. Sometimes, a gentle nudge or a slight adjustment in your angle can prevent a catastrophic tear, turning a potential failure into a seamless, professional finish.
The Fine Art of the Dip: Five Nuances for the Perfectionist
- Respect the Geometry of the Submerge. When dealing with those stubborn, irregular curves, speed is your enemy. I’ve learned that a slow, deliberate tilt—almost like a choreographed dance—is the only way to ensure the film wraps around a protrusion rather than bunching up into an unsightly wrinkle.
- The Prep Work is the Soul of the Finish. It’s tempting to rush straight to the film, but a surface that hasn’t been meticulously degreased is a surface destined for failure. Think of it as setting the stage for a play; if the floor is uneven, no amount of brilliant acting can save the performance.
- Temperature is a Silent Variable. I often find myself glancing at my thermometer, much like my grandfather used to check his old engineering schematics. The viscosity of your activator and the fluidity of the film are deeply tied to the ambient temperature of your workspace, so don’t let a sudden chill ruin your pattern.
- Micro-Adjustments Over Macro-Fixes. If you see a slight misalignment as the object enters the water, don’t panic and try to yank it back. Small, gentle nudges of the object can often guide the film into place. It’s about working with the tension of the water, not fighting against it.
- The “Less is More” Activator Philosophy. We live in an era of excess, but in hydrographics, more activator often leads to a muddy, blurred mess. Aim for a fine, even mist that breathes life into the pattern without drowning the intricate details in a chemical haze.
The Soul in the Submersion: What We Really Learn from the Dip
Precision is more than just following a manual; it’s about developing a rhythmic intuition for how tension and fluid dynamics dance together around an object’s unique geometry.
Embracing the “beautiful mistake” is vital, as the unpredictable nature of hydrographic film often reveals more about the character of a surface than a perfectly sterile, factory-applied finish ever could.
Mastery lies in the intersection of patience and physics, where understanding the microscopic behavior of surface tension allows us to transform a mundane object into a canvas of intentional, complex art.
## The Fluidity of Form
“When we submerge a jagged, irregular object into a layer of floating pigment, we aren’t just applying a pattern; we are witnessing a momentary truce between rigid geometry and fluid chaos, proving that even the most stubborn surfaces can be reclaimed by a bit of artistic surrender.”
William Daby
The Alchemy of the Dip
As we wrap up this deep dive into the mechanics of hydrographic application, it’s clear that mastering complex geometries isn’t just about following a recipe; it’s about understanding the delicate dance between chemistry and physics. We’ve navigated the nuances of film tension, the critical importance of surface preparation, and the subtle art of managing water tension to ensure that the pattern clings to even the most stubborn curves. Success in this process requires a blend of technical precision and a willingness to troubleshoot when the film doesn’t behave as expected. Ultimately, it is the careful management of these variables—the spray, the dip, and the drying—that transforms a standard object into a piece of customized art.
Looking at these finished pieces, I can’t help but think about how much this process mirrors our broader relationship with technology. We often view tools as rigid or deterministic, yet hydro-dipping shows us that even through highly controlled chemical processes, there is a beautiful, unpredictable spontaneity that emerges. It reminds me of why I love exploring these intersections of craft and science: because when we master the tools, we don’t just replicate patterns; we gain the agency to redefine the very objects that inhabit our world. So, don’t be afraid to get your hands a little messy—the most profound transformations often happen just beneath the surface.
Frequently Asked Questions
How do I prevent the film from tearing or bunching when I'm trying to dip an object with deep recesses or sharp, irregular angles?
When you’re staring down those deep recesses, it feels less like art and more like a high-stakes negotiation with physics. To keep the film from bunching, I’ve found that slowing down is your best tool; don’t rush the plunge. Try using a specialized spray adhesive to lightly tack the film to the water first, or even better, use a gentle, steady stream of compressed air to guide the film into those stubborn nooks as you submerge.
Is there a way to maintain color consistency if I'm working on a large-scale project that requires multiple dipping attempts?
The specter of inconsistency is the true villain in any large-scale creative endeavor. To keep your hues from drifting, you have to treat your setup like a laboratory. I’ve found that meticulously logging every variable—film batch numbers, activator spray distance, and even ambient humidity—is vital. Most importantly, never rely on “eyeballing” it; use a standardized dipping rhythm and keep your chemical ratios strictly consistent to ensure each piece feels like part of the same soul.
Beyond the technical execution, how does the choice of pattern or texture change the perceived "soul" or aesthetic value of a mass-produced object?
It’s a fascinating question, isn’t it? When we apply a marble swirl to a plastic casing, we aren’t just changing its color; we’re performing a kind of digital alchemy. We’re stripping away that sterile, “factory-line” identity and replacing it with something that feels intentional, even organic. By choosing a specific pattern, we move from mere consumption to curation, injecting a sense of unique character—a “soul”—into objects that were originally designed to be identical.